Our Black Shiplap Wall: Before, After & Tips
As our 2020 projects continue, one bonus, unexpected project popped up: figure out this crazy, messy cubby situation. We’ve got two boys. They have a bunch of stuff: backpacks and books and notebooks and a million things they don’t need but hoard. My husband has a bunch of stuff: work bag and things he intends to take to work (and never does), and mail he doesn’t know what to do with. I have a bunch of stuff: books and books and more books, mail and bags and chargers and so many other things. The drawers on the bottom were filled with shoes, scarves, gloves and dozens of other randoms. So pretty much always, this cubby area was a hot mess. And while super practical, I’d been hating it more and more through the years. I keep a super tidy home and this was one of those ugly spaces I didn’t want to look at, didn’t want anyone to look at.

My first idea was to find a furniture piece with doors. Close the door on this SH*T so I didn’t have to look at it! But the biggest issue we ran into is that most of the furniture I found stuck out too much. We have a small kitchen and the walk space between the cubbies and the dining chairs was narrow. I couldn’t eat up more of that space. When I was going on and on about this to my husband, he asked whether we really needed the cubbies to begin with. Ummm yes! Of course! That was my first response. I mean, where else would we put all this stuff? But I began to really think through it. I mean, shoes could go in closets (gasp! novel idea!). Books could go in the office, or in bedrooms. Stuff, mail could actually get filed. Gloves and scarves could actually go in the coat closet (mind you, the coat closet was filled floor to ceiling with pillows, but this forced me to clean that closet out – bonus!).

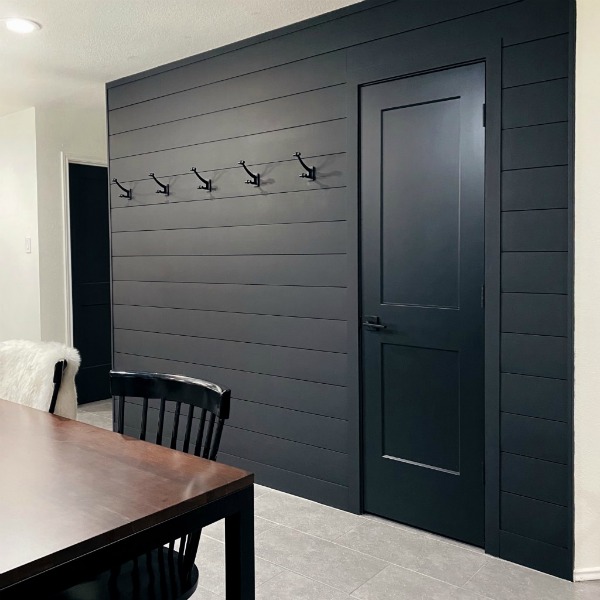
While the rest of the house was being painted that beautiful creamy white, we refrained from painting this wall. I really wanted some kind of feature/accent wall, I just didn’t know what I wanted exactly. I had also always wanted a black wall, so I wondered whether we could do it here. And then it came to me, I could use shiplap to give the wall some structure, in black, and then add hooks for backpacks, bags, and coats… that was the minimum I thought we needed.

I found 8-inch-wide black pine shiplap at Home Depot, kiln-dried so it wouldn’t warp over time, with easy grooves to fit each board together. Click! The sheen was a little glossy though, I wanted a matte finish (like the rest of the walls). So I also picked up a gallon of Sherwin Williams Black Magic paint — a beautiful, soft black. Then I searched for hooks… I wanted something larger, modern and black too. I was digging the monochromatic matte vibes. I fell in love with the Elroy Double Hooks from Rejuvenation. Super pricey, but I couldn’t find anything I loved as much, so I splurged. SO WORTH IT.
We considered doing the project ourselves, but I didn’t have a saw and already had a contractor working on some other tasks. I also wanted to be super sure that the hooks would bear weight really well over time, and I didn’t trust myself with that task. Unfortunately our original contractor fell through, but we reached out to someone else we already knew and he came by and rocked it. I also decided while we were working on this wall, to switch out the baseboard and molding to something more modern (we’ll be doing that to the rest of the house later in the year).

We couldn’t be happier with the outcome.
I was so worried that it was going to come off looking goofy or weird or out of place, but it looks so good and cohesive with the rest of our home. I think that painting the black shiplap made all the difference too. My husband, and even my contractor, had doubts on whether we really needed to paint, but it was important for sheen, to cover marks and scratches, and to soften the look. I’m telling you, this made ALL THE DIFFERENCE.


If you are so inclined to give this shiplap wall a go in your own home, here are some tips based on what we learned:
- Order more shiplap than you need. We received a lot of damaged, scratched and broken pieces, so I had to order (and wait for) more. We returned what was damaged very easily at Home Depot.
- Consider the finish/outcome you are trying to achieve. Painting over the shiplap can soften the look and bring cohesion with the rest of the space.
- Think about the width of shiplap you want to use, as well as the direction in which you want to use it. I wanted a thicker shiplap because I felt it looked more modern. I also considered placing the shiplap vertically, but because I wanted to hang hooks and because this wall is a fairly large horizontal space, I thought placing the pine horizontally would work best, but honestly, the wall would’ve probably worked both ways.


10 Comments:
Leave a Reply
On Instagram


Vilma Iris © Copyright 2024
Designed and Built with  by Priceless Design Studio
Mary Sheriff said:
This looks absolutely amazing!
Fran said:
First of all that wall is stunning! I want to do my laundry room exactly that width and finish. Could you email me the information? I’ve been looking for this for a year and I think it’s a matte finish, but not sure.
I would appreciate it so much and be so grateful
Frankie
vilmairis Post author said:
Hi Frankie, if you go to my Instagram, and click on the Shiplap highlight, I link all the sources 🙂 Good luck with your laundry room!
Melissa Muhly said:
Hi..the link to your instagram for this post appears to be broken. Wondering if you could tell me what color black you used for the shiplap?
Thanks!!
vilmairis Post author said:
Hi Frankie, if you go to my Instagram, and click on the Shiplap highlight, I link all the sources 🙂 Good luck with your laundry room!
Brooke Grasley said:
I’m obsessed with this!! Looks absolutely AMAZING! 🙂
Mike said:
Could you link to the molding you used?
Thanks!
David said:
This looks so handsome! Love the sharp, masculine, modern look. I noticed you had electrical outlets on the “before”; did you guys decide to remove those or just re-position? I’m sure either one of those options made for a separate task/price. Thanks
Celia said:
Wow! That is absolutely stunning!! 😍 For those of that don’t have Instagram, do you mind sharing the black paint color and finish? 🖤
Lauri Ley said:
Where are the outlets that are in your “before” picture? The white outlet and face plate?